- Stable download
- Development code
- General notes
- MS-DOS notes
- Unix/Linux notes
- Compilation
- Using the command line
- Viewing output files
- Version history
- Running PLINK
- PED files
- MAP files
- Transposed filesets
- Long-format filesets
- Binary PED files
- Alternate phenotypes
- Covariate files
- Cluster files
- Set files
- Recode
- Reorder
- Write SNP list
- Update SNP map
- Update allele information
- Force reference allele
- Update individuals
- Write covariate files
- Write cluster files
- Flip strand
- Scan for strand problem
- Merge two files
- Merge multiple files
- Extract SNPs
- Remove SNPs
- Zero out sets of genotypes
- Extract Individuals
- Remove Individuals
- Filter Individuals
- Attribute filters
- Create a set file
- Tabulate SNPs by sets
- SNP quality scores
- Genotypic quality scores
- Missingness
- Obligatory missingness
- IBM clustering
- Missingness by phenotype
- Missingness by genotype
- Hardy-Weinberg
- Allele frequencies
- LD-based SNP pruning
- Mendel errors
- Sex check
- Pedigree errors
- IBS clustering
- Permutation test
- Clustering options
- IBS matrix
- Multidimensional scaling
- Outlier detection
- Case/control
- Fisher's exact
- Full model
- Stratified analysis
- Tests of heterogeneity
- Hotelling's T(2) test
- Quantitative trait
- Quantitative trait means
- Quantitative trait GxE
- Linear and logistic models
- Set-based tests
- Multiple-test correction
- Basic permutation
- Adaptive permutation
- max(T) permutation
- Ranked permutation
- Gene-dropping
- Within-cluster
- Permuted phenotypes files
- Imputing haplotypes
- Precomputed lists
- Haplotype frequencies
- Haplotype-based association
- Haplotype-based GLM tests
- Haplotype-based TDT
- Haplotype imputation
- Individual phases
- Making reference set
- Basic association test
- Modifying parameters
- Imputing discrete calls
- Verbose output options
- File format
- MAP file construction
- Loading CNVs
- Check for overlap
- Filter on type
- Filter on genes
- Filter on frequency
- Burden analysis
- Geneset enrichment
- Mapping loci
- Regional tests
- Quantitative traits
- Write CNV lists
- Write gene lists
- Grouping CNVs
- Overview/example
- Basic usage
- Consistency checks
- Aliases
- Joint IDs
- Lookups
- Replace values
- Match files
- Quick match files
- Misc.
- HapMap (PLINK format)
- Teaching materials
- Multimarker tests
- Gene-set lists
- Gene range lists
- SNP attributes
gPLINK
|
gPLINK is a freely-available, Java-based software package that:
|
Documentation
In this Section, we cover:- Overview of gPLINK
- Local versus remote modes
- Starting a new project
- Configuring gPLINK
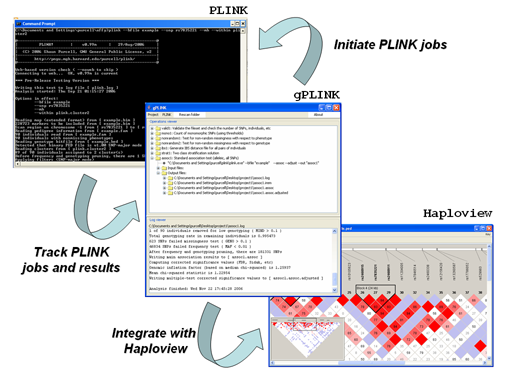
- Initiating PLINK jobs
- Viewing PLINK output
- Integration with Haploview
- Miscellanea and known issues
Overview of gPLINK
gPLINK is a Java program that provides a simple form interface to the more commonly-used PLINK commands (i.e. instead of using the command line options). gPLINK provides menus and dialogs to create valid PLINK commands, executes them, keeps a record of all commands run in a project, keeps track of input and output files, allows annotation of result files and facilitates integration with Haploview. Important Only common PLINK commands are included in gPLINK forms. However it is possible to enter whole PLINK command lines via PLINK -> Create Plink Command, which can be useful if the exact PLINK option has not been incorporated into gPLINK. Alternatively, gPLINK can be used to collate previously-generated PLINK analysis, organizing the results and allowing for easier browsing with Haploview. Using gPLINK in this "browse-only" mode, it can provide a means for distributing results of analysis to a wider set of collaborators, for example. Please refer to the main PLINK documentation pages for a more detailed description of the different analytic options and the output file formats. gPLINK provides can be used to initiate analysis from the five major domains of PLINK commands; the menu options are shown in the figure below: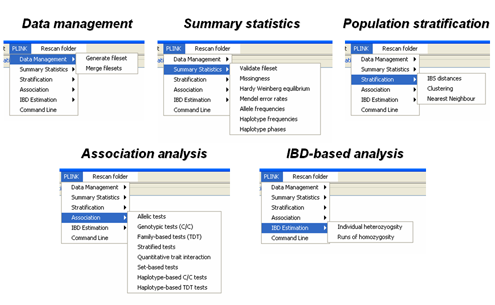
gPLINK is currently considered stable, however from time to time there may be updates to add new PLINK commands. In gPLINK, a project corresponds to a folder, either on the local machine or on a remote machine. All output will be written to that folder. Each operation must be assigned a unique fileroot name, which is used to track operations. gPLINK keeps track of the commands run, and which files were used for input and which were created as output, storing this information in a metafile in the project folder. gPLINK has three main panes: Folder viewer, Operation viewer and Log viewer. Folder viewer shows a list of the files in your current project. Left-clicking on the Folder viewer you can open files, launch Haploview, track the hierarchy of a file and edit file notations. Operation viewer displays the operations recorded by gPLINK, their associated input and output files as well as any operations notes. Left-clicking on the Operations viewer will pop-up options to: open files, edit operation notes, unlink/link files to/from an operation, create a new PLINK operation, and delete operation. Log viewer shows the log file associated with the selected operation in the Operation viewer.
Local versus remote modes
You can run gPLINK in one of two modes: either local or remote. In local mode, everything resides on the same machine: PLINK, gPLINK, Haploview, the data and all computation. In remote mode, PLINK, the data files and all PLINK computation reside on a separate Unix/Linux machine, connected to the local machine via SSH. The user runs the two Java-based tools gPLINK and Haploview on the local machine, issuing commands to the remote machine that actually does all the work; select results files can be downloaded to the local machine for subsequent viewing, either using Haploview or any other local software. In remote mode, gPLINK will use two project folders: one remote folder where all the original data and results are stored, and one local temporary version. Any file in the temporary folder can be deleted after the session finishes. If the remote server is also the head node of a cluster, and if jobs are sent to the cluster with a simple prefix on a command line, then gPLINK can also send PLINK jobs off to the cluster to be performed. To utilize remote mode, you need- To have a Linux/Unix server with PLINK installed
- To have access to this server via SSH (secure shell)
Starting a new project
The first step is always to create a local project folder by creating a new folder/directory (using the standard operating system, as you would create any other folder/directory). If running in local mode, you will typically want to populate this folder with your datasets. If running in remote mode, this local folder will typically be empty, and it will just be used as a place to store temporary files. On opening gPLINK, you first select which local project folder you'll be using, with the File -> Set project folder option. Next, you indicate whether the project will be local or remote. See the tour for more details on these steps.Configuring your project
After you have opened your project folder, a configuration dialog will pop up. Here you should set the PLINK path to point to your current copy of PLINK (plink.exe in Windows, otherwise plink). If in remote mode, you will be pointing to the copy of PLINK you wish to use on the remote server. If you intend to use Haploview, you need to set the Haploview .jar path to where the .jar file. You need Haploview version 4.0 or later to integrate with gPLINK. The Editor options allows you to pick what command you wish to call when you view input or output files. This is an advanced feature and the defaults should work fine in most cases. Again, see the tour for more details on these steps.Starting PLINK jobs
By this stage, you have started the project and configured gPLINK. You only need to configure gPLINK once at the start of each project. To initiate a PLINK job, select the appropriate menu option from the PLINK menu. A dialog will be shown, in which you must:- Specify the binary or standard fileset to be used for input
- Specify a unique name for the output files
- Select an alternate phenotype file
- Set filters and thresholds
- Change other parameters relevant to the requested analysis
Viewing output files
You can view the result files by expanding the tree for the desired operation, going to the list of output files and left-clicking on the selected entry. Alternatively you can select the file from the Folder viewer in a similar manner. You will be given a choice to view the file in the default viewer or an alternate viewer. The default viewer depends on the machine type: it will be WordPad, TextEdit or emacs for Windows, Mac and Linux/other systems respectively. The alternate viewer can be set to anything (e.g. Excel) via the Configuration menu option.Integration with Haploview
If in the Configuration panel you pointed gPLINK to an instance of Haploview (version 4), then an Open in Haploview option will also appear. For results files, this will bring up the results-viewer panel of Haploview. You can filter and sort results here as well as merging multiple result files together. You can also generate plots of results very easily (which are interactive in the sense that if you hover the mouse over a point, it will tell you which SNP, or individual, the point represents; clicking on the point will take you to the relevant entry in the results table). It is also possible to extract subsets of your whole genome SNP data files for viewing in Haploview (i.e. viewing data rather than results of PLINK runs). Use the Data management -> Generate fileset -> Haploview fileset option for this. Then right-clicking on either the .info or .ped file and selecting to view in Haploview will load the data into Haploview. Note: use the filters to select manageable subsets of the data for viewing in Haploview (i.e. restrict the number of SNPs you wish to include).Miscellanea and known issues
How do I kill a PLINK process initiated by gPLINK? When you run a PLINK command from gPLINK a separate PLINK program is started independent of gPLINK. This means that you can close gPLINK and your operation will run to completion. It also means that if you decide to kill your PLINK operation you will need to do so through your operating system (for example kill in Linux or through Task Manager in Windows). Manual Rescan folder option The menu option Rescan folder checks the project folder for files created by PLINK commands. Typically this rescanning is performed automatically, for both local and remote projects, every couple of seconds or so and can be set for a different timing in the Configuration dialog. This option is for the inpatient, therefore. Quirks, known issues In no particular order:- All input files must have an extension (contain a period .) if they are to appear in the operation view
- Do not attempt to use different machines with different architecture to access a project on a shared network drive that is mapped to the different machines. That is, in this case, PLINK would be running in "local" mode.
- Java 1.5 is required to run gPLINK.
Download and installation
You first need up-to-date versions of Java, PLINK and Haploview on your computer. Please follow all 4 of these steps:- You will need Java 1.5 installed on your machine: this is freely available from the Sun website, for all common platforms. To download Java, follow this link and select Download Now.
- You need PLINK version 0.99p or greater to work with gPLINK, which can be downloaded from here.
- A beta version of Haploview that supports gPLINK can be obtained from this page
- After completing the above three steps, download the latest gPLINK (version 2.050) by clicking here for the JAR file (as a zipped archive).
java -jar gPLINK.jar
will start gPLINK (you must be in the directory where gPLINK.jar is,
or specify it's location explicitly; likewise, java must be in your path; please
ask your system administrator if you have problems with this).
Source Code
For interested developers the source code can be found here. Note that most users do not need the source code!